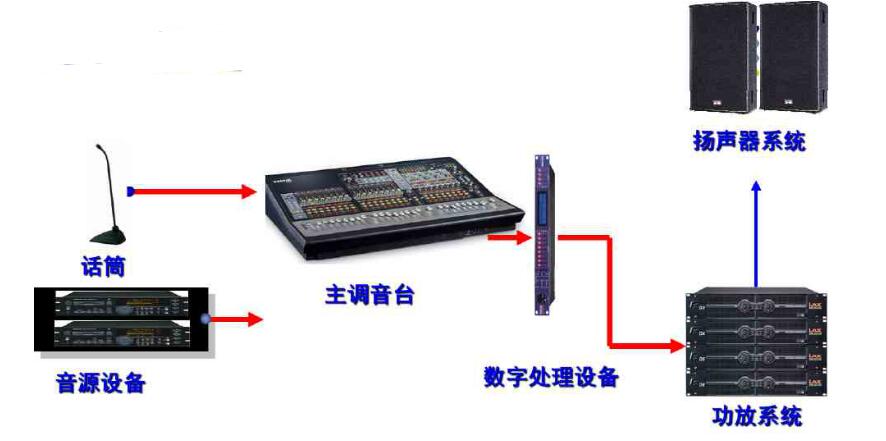
The basic composition is as follows:

System flow:
The debugging steps of a sound reinforcement system are generally divided into two aspects. The first is the debugging of the objective performance of the system, and then the debugging of subjective effects.
First, the system objective performance debuggingThe main purpose is to make reasonable settings for the product characteristics in the system and to compensate for possible defects in the system, so that the system's security is guaranteed and provides a high degree of reduction. This part of debugging includes the following aspects:
1, according to the speaker's frequency response characteristics set the crossover in the high-pass and low-pass filter (HPF and LPF), the purpose is to provide the speaker with the performance of its working frequency band, while cutting off the band that can not be expressed, so that speakers should have The performance ability of the game is normalized and it does not undertake work beyond its capabilities and enhances security.
2, the speaker transmission time measurement, calibration time difference between different speakers, the purpose of this step is to use the delay device on the different installation position of the speaker to reach the main listening area of ​​the transmission time consistency correction, reduce the transmission time caused by different The system internal loss caused by phase interference.
3. Measure the defects of the frequency response characteristics of the sound reinforcement system by using spectrum measurement tools, and use an equalizer to compensate. The purpose is to reduce the frequency response characteristic defects of the sound reinforcement system caused by the equipment's own defects and environmental defects and improve the system's reduction capability. .
4. Use the limiter to control the signal strength of the system to avoid excessively large level signals from entering the power amplifier. The purpose is to prevent the amplifier from inputting excessive signals and causing clipping distortion, thereby damaging the speaker.
After the above steps are completed, the objective performance debugging of the system is completed. At this point, everything from the microphone to the speaker will show a harmonious state.
Second, the subjective effect of debuggingThis is based on a well-reduced system that performs artistic processing of subjective listening effects. There are three aspects of sub-microphone tuning and other source tuning and voice balance processing.
A/microphone tuning:
1, access the microphone, first set the input level, do not let the mixer appear distorted, and then use the balance on the mixer, the microphone's own frequency response characteristics of the compensation, the purpose is to overcome the microphone's own frequency response defects , Improve the microphone's degree of reduction, and more truly show the sound source (singer or musical instrument) sound.
2, based on the basis of the former microphone reductive, found that the vocal (some singers have a certain defect in their own voice) defects, the use of mixer fine-tuning, trimming, avoid weaknesses, cover up defects.
3. After the above debugging, the possibility of a general microphone screaming is not so great. If there are individual microphones that scream, you can use the method of inserting an equalizer to perform targeted processing.
4, if the quality of the microphone used is generally or the singer's voice quality is not high, you can use the exciter to change the texture.
5, after completing the above two steps, start adding effects, according to the singer's situation decided to use reverb or delay or reverb + delay effect type, set a good effect, to meet the singer requirements, based on the best possible Clean and full effect.
B/other sources:
1. Finished product sound source (including various recorded sound sources): Set the input level in the normal range, then play music listening, mainly to find the defects of the sound source, and use the mixer to compensate for the balance. And according to different needs and musical characteristics, using the mixer to achieve a balanced adjustment, to make people want the sound.
2, musical instruments: based on the higher degree of reduction of the system, the performance of the instrument is generally more realistic, this time let the musicians play, set the input level, according to the musician's requirements or with reference to the original music in the tone, the instrument The timbre is adjusted so that the timbre of the instrument reaches the musician's request or close to that of the original. Instrumental tuning sometimes requires the addition of auxiliary equipment such as compressors or noise gates, all of which are used to improve subjective effects.
C/Voice Balance:
After the individual sound sources input to the mixing console are individually debugged, they need to be mixed in a certain proportion. This requires the concept of sound balance.
The balance of the voices, the strength of the various parts of the music is not the same, some strong and weak, grasp the relationship between them, mainly with reference to the original version of the various musical instrument voice and voice part of the strength ratio. Control the fader level of each channel on the mixer, so that the various voices are relatively harmonious, and do not have the feeling of disappointment.
Step by step to do every step of the work, the entire system can generally provide satisfactory results.
Also note that the debugging of the stage listening (listening) system requires more reproducibility than the main PA system. For the stage returning to listening, generally speaking, the sound of the returning system should not be artistically processed, but expressed as true as possible. The artistically processed sound often affects the judgement of the singer musicians on the stage to sing or perform themselves.
Detailed sound reinforcement system basic debugging 1, preparation1) Set the level of each peripheral device to 0dB and make it in the straight-through BYPASS (or OUT) state. If there is a -20dB/+4dB level switch (usually on the rear panel), it should be set to +4dB;
2) Turn the mixer and power amplifier gain GAIN (some power amplifiers use the level LEVEL or attenuation ATTEN) knob to the minimum;
3) The frequency balance of the mixer and peripheral devices are all set flat;
4) Set the frequency and slope of the frequency division according to the design requirements;
5) The volume of the monitor monitor headphone is about half open, and the monitor and meter selection switch is set to the total output;
6) If the amplifier is bridged, place the switch on the bridge BRIDGE (or monaural MONO) side.
2, trial sound1) Turn on the console and play the sound source. Push up the total volume and the volume fader of the source channel. The earphone should hear the source signal. When the fader is on, the mixer level meter should have corresponding indication.
2) Turn on the power supply of all peripherals (except for the by-pass devices such as effect units) in order, and each device should have a level indication of the volume change with the sound source;
3) Turn on the power of the amplifier, and then turn on the level buttons of each channel one by one. The corresponding channel speaker should sound. Listen to the sound is basically normal;
4) If necessary, a phase meter can be used to check that the speakers are in the same phase (usually guaranteed by construction);
5) After the test sound, the gain of the amplifier is still minimized and the power of the amplifier is turned off.
3, system level1) Set the mixer's main output fader to 0dB;
2) Place fader channel fader at 0dB, play 315Hz, 0dB sine signal, adjust the channel gain button GAIN so that the meter indicates 0dB, other line channel gain buttons can also be adjusted according to their position, and then according to the program Source actual level correction. Some compact mixer stereo channel channels do not need to be adjusted without the gain button;
3) Remove one end of all speaker cables, and connect the AC voltmeter to the output terminal of the amplifier's channel.
4) Turn on the amplifier and adjust the gain button of the channel to make the output of the amplifier reach the [Note] voltage value indicated by the construction task book or calculated according to the required power and impedance of the speaker.
5) Adjust the other channels one by one, adjust the speaker cable and reconnect it.
6) When the bass channel is adjusted, the signal is changed to 100Hz.
4, system frequency equalizationNote: The environment should be quiet!
1) Equalization is placed in EQ (or IN) to enable equalization access to the system;
2) The spectrum analyzer microphone is located in the middle of the listening area and points upwards. (If the site construction sound has high frequency sound absorption, it can be pointed to the loudspeaker so that excessive compensation of the high frequency may cause the loudspeaker tweeter to be damaged);
3) Input the pink noise signal of the spectrum analyzer into a certain channel of the mixer. The frequency equalization of the channel must be at 0, the auxiliary AUX output is minimized, and the panning PIN button is first placed on the left channel;
4) Gradually push up the channel and the output channel fader to make the loudspeaker emit a loud noise signal (mixer level indication is about -6~-10dB);
5) Adjust the spectrum analyzer microphone gain so that the frequency indication is distributed around 0dB. At this point, the noise signal is turned off, and the spectrum analyzer should be instructed. Otherwise, the noise level of the spectrum analyzer microphone should be properly reduced to increase the noise output level so that most of the frequency indications can be kept below 0 dB.
6) Adjust the parameters of each frequency gain of the graphic equalizer or the frequency, Q value, and gain of the parametric equalizer according to the spectrum analyzer display, so that the frequency levels displayed by the spectrum analyzer tend to be consistent. When the figure of the equalizer is adjusted too much at a certain frequency, it is advisable to adjust the upper and lower frequency points at the same time so as to avoid the difference between the levels of the adjacent two frequency points being too large.
Note: Do not increase or decrease the gain of a certain frequency point for the system to have a particularly flat frequency response. This will degrade the sound quality of the ambassador due to phase distortion. Therefore, for the phenomenon that the pre-equilibrium frequency response curve is too uneven, it is necessary to start from the aspects of improvement of sound construction and replacement of speakers with poor frequency characteristics, etc., and it is not possible to rely solely on system equilibrium to solve the problem. It is not necessary to over-strike at 40Hz and above 16kHz when debugging. At the same time, 3dB attenuation at 3.15kHz is appropriate.
7) After the left channel is tuned, place the PIN button on the right channel to adjust the right channel equalization in the same way;
8) After the left and right channels are adjusted separately, place the panning button in the middle and fine tune the total balance. When you want to tune a certain frequency point, you can first enhance (or attenuate) the original (or attenuating) smaller channels in the two channels;
9) Other channels are also debugged in the same way.
5, microphone level1) Turn the microphone channel gain GAIN knob to the minimum, and set the microphone channel and the total output fader to 0 dB. Use phantom power if you use a condenser microphone;
2) Put the microphone in the use position and insert the channel microphone socket;
3) For the microphone channel of the conference, the low frequency equalization of the channel can be attenuated by 6dB, and high frequency attenuation by 3dB;
4) Talk to the microphone about 20 centimeters away from the microphone at normal volume, and slowly increase the channel gain button until it starts to generate feedback whistle, then return the gain button back to a point;
5) If the system is equipped with a smart mixer, first turn the channels and total output gain knob of the smart mixer to the center position and adjust them as described above. If the smart mixer is overloaded, reduce its gain and increase the mixer channel gain.
Because there is a difference in the sensitivity of the microphone or the indication error of the gain knob of each channel of the intelligent mixer, each channel should be tested one by one to correct the gain of each channel so that the volume is basically the same, and the microphone is marked to facilitate the “seat registration†in the future.
Note: The output of smart mixer is generally line level and cannot be connected to the mic input of the mixer channel (some mixer input channels do not have line input jacks, but use the PAD button to make the channel input from the microphone Level change to line level) to avoid over-amplifying microphone stage amplification;
6) If the feedback whistling starts and the volume of the microphone is still not enough, when the system is equipped with a feedback suppressor, the feedback suppressor can be adjusted to increase the gain of the mic channel, and the frequency of the microphone channel can also be used. The channel equalization appropriately attenuates the gain of the howling frequency (as can be seen from the spectrum analyzer) to increase the sound transmission gain; for the lecture hall, the system equalization can be used to properly attenuate the howling frequency; if necessary, the position and angle of the loudspeaker are also adjusted. Improve the sound to solve.
6, feedback inhibition1) According to the instructions to set the status of fixed filter and other states;
2) After setting, the microphone is placed in the use position. Gradually turn on the microphone volume of the mixer until it starts to generate feedback whistle. Slow down the speed of increasing the volume. Pay attention to the feedback suppressor filter instruction. When the whistle frequency is suppressed, a filter indicator will be displayed. At this time, the microphone volume should be quickly turned off to avoid triggering multiple filters at the same time;
3) Repeat the above steps until the set fixed filter is used up;
4) If you use multiple different microphones, consider using several filters for each microphone.
7, pressure limit (only for limiting)1) The input and output levels are all set to 0dB. The start-up time ATTACK and the recovery time RELEASE can generally be set to several tens of mS and 1S respectively. The noise gate GATE is turned anti-clockwise and the compression ratio RATIO is set to 1:10 or more. IN /OUT button is placed at IN;
2) Normally, the limit can be set when the input power level is equal to or slightly lower than the rated output power of the amplifier. Therefore, the threshold THRESHOLD can be set to +4 dB. Since the knob is not necessarily accurate, adjustments can be made as appropriate. The method is to turn off the power amplifier, the mixer plays a 1 kHz sine signal and adjusts to the level meter to indicate +4 dB, and then adjusts the threshold so that the pressure limit just starts to start;
3) If you think that the system noise is too large, you should first find out the reason. When you have to, in the last resort, you can adjust the noise gate clockwise so that the noise is suppressed when there is no input signal. However, noise gates generally should not be set too high, so as to avoid the smaller useful signal is also suppressed or even cause the signal intermittent. Note that some compressors have to press the GATE button noise gate to work;
4) After the left and right channels are adjusted separately, press the linkage DOUPLE button;
5) Some limiters have a separate limiter function. If the limiter is used as a limiter, it can be turned OFF.
8. Acoustic and Image Consistency1) Speak with a microphone on the stage, and check whether the sound position of the left, middle and right seats in the front and back field is basically on the stage;
2) For systems that use only the left and right front speakers, listening to the left and right seats on the front field will bias the sound image to the side of the listening position and cannot be adjusted;
3) The use of an independent center channel 3-channel sound reinforcement system, microphone amplification is usually center channel speaker. If the sound field unevenness does not meet the requirements of the index, the left and right channel speakers can be used as appropriate, but the sound pressure should be appropriate so that the sound image is too biased towards both sides;
4) When there is a pull-down and lip-replenishing speaker, listen to the sound in the front row and adjust the sound pressure so that the sound image is on the stage. Do not feel too high or too low;
5) When there is a back-filling speaker, the sound pressure and delay of the back-field speaker should be adjusted so that the sound-filling speaker does not appear to be present when the back-filling speaker near the back-filling speaker is listening.
9, sound field unevenness1) Play a pink noise signal at about half the power, measure the sound pressure level at several different positions in the field using a sound level meter and calculate the sound field inhomogeneity. If the index is exceeded, make adjustments;
2) The system uses only the front left and right speakers to adjust the speaker's internal and downward angles;
3) When using the back-fill speaker, the sound pressure ratio of the front and rear speakers can be properly adjusted. However, the sound pressure of the fill-in speaker cannot be too large, so as to avoid the influence of sound and image consistency.
10, effect processing1) Turn on the power of the amplifier and turn off the power of the amplifier. First use the monitor earphone first, then turn on the amplifier power and correct it according to the actual sound reinforcement result of the speaker;
2) Set the channel fader that needs the effect processing to the mixer to 0dB, open the channel and the total effect sending button, and speak to the channel microphone. The effect device should have level indication. After selecting the effect type and editing the parameters as required, open the effect return button and you should hear the sound after the effect is processed.
3) Adjust the mixer effect send and return levels. When the sending level is large and the return level is small, the effector noise is small, but if the sending out is too large, the effector may be overloaded. Generally adjust the sending level so that when the microphone speaks loudly at close range, the effect level indicator is preferably 0~+3dB;
4) Selection of effect types: For singing, "hall HALL" or "delay plus reverberation DELAY+REVER" may be used, but many karaoke singing is more commonly used in KTV private rooms. The repeated delay is also called "echo ECHO or "KARAOK", depending on the actual singing performance and with reference to the owners preferences. Bel Canto and national singing are usually not treated effectively;
5) Conference microphone channels and audio playback (disc, television and video conferencing, etc.) channels generally do not add effect processing.
11, self-test and correction1) According to GB-T4959-1995 "Measurement method of hall sound reinforcement characteristics", measure the system's maximum sound pressure level, frequency response and sound field non-uniformity and other major technical indicators;
2) Play "Program Source for Subjective Evaluation of Sound Quality of Electroacoustic Products" for preliminary listening evaluation, and pay attention to speech intelligibility in the conference hall;
3) If there are projects that fail to meet the design requirements, adjustments need to be made. If necessary, designers should work together to study solutions.
12, backup and lockAfter debugging, the status of each device's control button is best preserved as a photo; if a digital audio processor is used, it can be backed up and stored on the computer; some processors cannot be backed up by the computer, and the computer interface of the debugging result can be used by the computer. Save the screenshot; only the processor that can't connect to the computer (such as dbxPA) can only record with the pen.
The digital audio processor usually has a code lock, and after the end of debugging, it should be locked so that the debugging state is disturbed by others. The password should be properly stored in the debug log.
[Note] For example, if the speaker impedance is Z=8Ω and the required driving power is P=300W, the output voltage of the power amplifier is V.
Silicone Glass Fiber Tube,Pre Insulated Tube,Braided Shield Sleeve,Wire Shielding Sleeve
Shenzhen Huiyunhai Tech.Co., Ltd. , https://www.cablesleevefactory.com