A method in which a surge tester can operate normally and is easy to implement during a calibration cycle.
Energy measurement test
The international standard for medical electrical equipment, IEC 60601-1, contains a number of surge tests to ensure that the device under test is still functioning properly with defibrillation pulses. These tests are described in Figures 9, 10 and 11 of IEC 60601-1. Each test requires a 5000 V power supply that provides 400 J of energy, and the energy output on the tester is approximately 360 J (worst case). These three figures in the standard describe the different methods of transmitting this pulse to the device under test.
The two methods described in Figures 9 and 10 of IEC 60601-1:2005 are normal mode and differential mode tests, respectively, which can be used to check the separation between signal input/output components and patient connection components. A voltage divider network is used to monitor the voltage change of the signal input/output components when a 360-J pulse is applied.
The IEC 60601-1 safety standard generally requires an energy measurement test in the 2005 version, which was introduced into the general medical standard from the safety requirements of the IEC 60601-2-49 multi-function patient monitoring device. This new requirement stipulates that instruments connected to the patient will reduce defibrillation energy delivered by a 100 Ω load by up to 10%.
The above three tests and many other surge tests in the AAMI and IEC medical standards use the 5000-V/400-J engine, but the waveform components and application techniques are different. Because of this similarity, test equipment manufacturers have been able to develop a tester that meets multiple standards at the same time. By looking at the documentation of the IEC 60601 defibrillation tester, the user is able to know exactly which standard tests the device can perform; in addition, you can view the connection information for each test method.

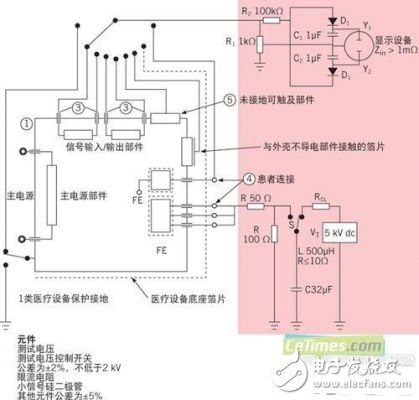
Figure 1: IEC 60601-1:2005 Figure 9 – Application of test voltage in patient connection in defibrillation application components
As shown in the example in Figure 1 (IEC 60601-1:2005 Figure 9), by determining the circuit component values ​​and tolerances, the pulses from the 5000-V/400-J power supply can be controlled in the same manner as the IEC/AAMI standard. The red shaded box area of ​​the figure shows the circuit that the anti-defibrillation surge tester should provide. The circuit in the lower half of the red box area is a universal 5000-V/400-J surge power supply. Below the circuit is a list of components and tolerances; please note that the tolerances of the surge power supply are ±5%. Waveform components vary by standard, but component tolerance values ​​for surge power supplies are also ±5%.
Calibration ensures that component tolerance values ​​meet the requirements. For anti-defibrillation surge testers that are not used or calibrated, the user can be confident that their tolerances are within the above range. However, unless the surge tester is turned on to re-check the component values ​​(which will cause the calibration to fail), it is not possible to directly confirm that the instrument is functioning properly during the calibration cycle. Below, we will introduce some methods to check the calibration status without opening the surge tester.
Waveform comparison
All three tests in the IEC 60601-1:2005 standard use a defibrillation surge tester (Figures 9, 10 and 11) with pass/fail points established on the pulse from 5000-V/400-J to the measured Based on the transmission of the device. However, if there is no reference data (except for inaccessible component values ​​and tolerances), it is not possible to confirm the power output based solely on the information provided in IEC 60601-1:2005. In addition, since the surge tester complies with IEC 60601-1:2005 requirements only depends on component tolerances, component tolerances can only be verified even if the calibration passes the ISO 17025 standard.

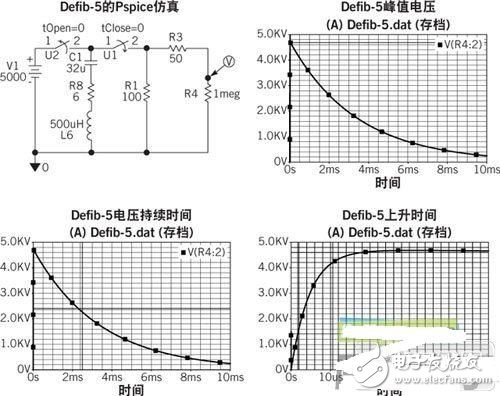
Figure 2: IEC60601 shows the current and the defibrillation waveform that caused the waveform
Some manufacturers provide waveforms of the expected output type according to the test conditions expected by the IEC 60601-1:2005 standard. If you get these waveforms, it is recommended that you check the output of the new Defibrillation Surge Tester against the resulting waveform as described below. If your individual tester does not provide a waveform, consider constructing an analog waveform using the component values ​​given in Figures 9 and 10 of IEC 60601-1:2005 (see Figure 2). Due to the tolerance limits of the IEC 60601-1:2005 standard, analog waveforms may not accurately simulate the output of individual anti-defibrillation surge testers. If the desired result is not obtained when evaluating the output, the other test methods described in the Energy Measurement Test Accuracy Assessment section below can also be used.
Waveform comparison test
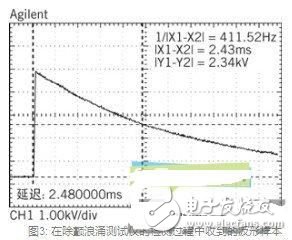
This method compares the new waveform generated by the Defibrillation Surge Tester with the waveform in the initial calibration packet when the instrument was received. If the above information is not available, the general analog waveform provided in Figure 2 can be used. This is a quick and easy way to verify the output of a surge tester. Figure 3 is an example of an initial reference waveform for reference.
One final point: The 5% component tolerances specified in the IEC 60601-1:2005 standard appear to be very strict, but our experience is that some output variations may occur even if all tolerance standards are met. If the output data of your Defibrillation Surge Tester is not ideal, you should not immediately make a conclusion about the current calibration status of the instrument and further testing is required. When using a standard anti-defibrillation tester, the output peak voltage will be between 4500 V and nearly 5000 V due to the tolerances and quality of the components used.
1. Use a high voltage high frequency oscilloscope probe. We used Tektronix P6015 (available in the second-hand market at an affordable price) and achieved very good results.
2. Use a digital oscilloscope. Set the input signal to 1.00kV/vertical index and 500.0 μSec/horizontal scale.
3. If your Defibrillation Surge Tester has multiple waveform networks, be sure to set it to 50 ohms, 500 μH.
4. Set the front panel meter to 5000 V, which indicates that the internal power supply is charged to 5000 V (the output will be below this value; see Figure 2).
5. Start the Defibrillation Surge Tester to allow current to flow to the open output while only the high voltage probe is connected.
6. Observe the scope display. The output peak should be between 4500 and 4900 V (not 5 kV).
7. Find the midpoint of the voltage peak waveform on the waveform duration side. The waveform should conform to the initial waveform and be placed near 2.42 milliseconds.
8. If the waveform peak or its duration is slightly lower than expected, the Defibrillation Surge Tester may not be able to transmit the required 360 J energy. Further testing should be carried out (see the Energy Measurement Test Accuracy Assessment section below) or scheduled for maintenance.
Energy measurement test (IEC 60601-1,): resistance measurement
The energy measurement test requires two measurements: one for measuring the exact output of the anti-defibation surge tester and the other for connecting the instrument to the output of the anti-defibrillation surge tester. The difference between the two measurements is within 10%.

Figure 3: Waveform samples received during the detection of the defibrillation surge tester
The order of the above tests is important. The resistance is reduced after the resistor is heated. The energy delivered after the resistance is reduced is reduced. This is important because when the instrument under test is connected to a defibrillation-proof surge tester, the change in resistance due to an increase in temperature affects the allowable 10% change in energy. Therefore, it must be ensured that both tests are done at the same resistance value. Although the resistor row provided by the manufacturer of the Defibrillation Surge Tester does not change its resistance by more than 5% of the nominal value if it is used according to the recommended duty cycle, it is recommended to measure the resistance between tests. The time it takes for the resistor to return to the initial resistance value used in the reference test may exceed the manufacturer's published duty cycle time.
Energy measurement test: resistance measurement
1. Discharge the cold resistance value of 100Ω into the anti-defibrillation surge tester before performing the energy measurement test.
2. Make sure the anti-defibrillation surge tester is not charging. This is ensured by following the manufacturer's prescribed procedures. Typically, the instrument should be started and the front panel voltmeter reading should be close to 0 volts.
3. Turn off the anti-defibrillation surge tester.
4. Place the ohmmeter between the energy measurement port and the anti-defibrillation surge tester ground wire. The measured value should be within ± 5% of 100 Ω.
5. Perform an energy measurement reference test; that is, according to the IEC 60601-1:2005 standard, no instrument is connected to the output of the anti-defibrillation surge tester. Confirm the output energy and record the result.
6. Repeat steps 2 and 3 above.
7. Place the ohmmeter between the energy measurement port and the anti-defibrillation surge tester ground wire. If the value is slightly lower than the measured value of step 4, wait for the resistor row to cool so that the value is close to the measured value of step 4.
8. Connect the instrument under test to the anti-defibrillation surge tester for energy measurement testing. If the above two results differ by less than 10%, they are qualified.
Energy measurement test (IEC 60601-1 Figure 11): Accuracy assessment
If your Defibrillation Surge Tester is already available for IEC 60601-1:2005 testing, you can equip it with an energy port for the test shown in Figure 11. This port can also be used to confirm the exact energy output of the anti-defibrillation surge tester. When using a 5000-V power supply and a 32-μF capacitor, the output energy of any test should be higher than 360 J (see Figure 1). This reference test operates in the same way as the first part of the energy measurement test. Since the method of transferring waveform data from an oscilloscope to an Excel spreadsheet differs depending on the oscilloscope used, the following is only a brief operational flow. In addition, users can also get a free spreadsheet from our website. A link to the URL is provided at the end of the article.
Energy measurement test brief flow
1. Remove the load from the output of the anti-defibrillation surge tester.
2. If necessary, set the anti-defibrillation surge tester to 25-mH, 400-Ω.
3. Measure the resistance of the 100-Ω resistor using the above resistance measurement method.
4. Using a suitable high voltage probe (eg Tektronix P6015), connect the oscilloscope to both ends of the 100-Ω resistor bank in the tester. For most testers, this position is between the energy measurement output and the tester ground.
5. Use a digital oscilloscope that can transfer waveform data to an Excel spreadsheet. Set up the oscilloscope to capture the entire waveform. Set the vertical axis to 1000 V/division and the horizontal axis to 2 msec/division.
6. Charge the defibrillation surge tester until its internal power source is charged to 5000 V. (In most cases, the power supply voltage is displayed on the front panel display.) Then, activate the anti-defibrillation surge tester.
7. The waveform should display the waveform of the complete oscilloscope waveform, starting from 0 V and ending at 0 V. Visit the URL http://Products/Downloads/Energy_calculaTIon_TUV_EC13_10.75ohm_open.xls for an illustration of the ideal waveforms included in the Excel spreadsheet. If the full waveform is not obtained with the recommended settings, adjust the settings until the full waveform is displayed on the oscilloscope display.
8. Transfer the waveform data to an Excel spreadsheet. The method of operation for this step depends on the type of oscilloscope used.
9. Open the Excel spreadsheet. Delete waveform data outside the start and end of the waveform. (The noise components of these data can lead to large energy results.)
10. Calculate the results using an Excel spreadsheet. The result should be higher than 360 J.
If the result is significantly lower than 360 J, the anti-defibrillation surge tester should be checked to correct the cause of the low output energy.
Anti-defibrillation component test (IEC 60601-1 Figures 9 and 10): Accuracy assessment
All of the above methods and discussions involve the power supply of the anti-defibrillation surge tester. Laboratories that follow these guidelines should ensure that the tester is functioning properly and is suitable for energy measurement testing. However, for the normal mode and differential tests shown in Figures 9 and 10 of IEC 60601-1:2005, it is also necessary to ensure that the voltage divider network is functioning properly (as shown in the upper section of the red strip in Figure 1).
One way to perform this verification is to replace the instrument under test with a known value, i.e., to replace all of the white portions of Figure 1 herein. This is the most efficient verification method; in addition, if you get the expected output value, you can also prove that the entire test setup is correct.
Some manufacturers offer a defibrillation pass/fail measurement tool that can be inserted into the above test setup. This pass/fail measurement tool is shipped with a specific anti-defibrillation surge tester because the same settings cannot be used for all testers in accordance with the tolerance specifications of the IEC 60601-1:2005 standard. However, an uncalibrated pass/fail measurement tool can still be used if necessary to obtain useful information while verifying the test setup and the overall integrity of the defibrillation surge tester.
in conclusion
This article describes the new surge test in the IEC 60601-1:2005 standard and describes some of the processes and recommendations to simplify the test and ensure that the test results are correct. In addition, this article describes some simple ways to ensure that your Defibrillation Surge Tester is functioning properly during the calibration cycle. These methods can be used to understand the overall condition of the defibrillator tester and to ensure that the tester connection is effective. We hope that these methods will help ensure that all tests are done while the equipment is working well.
ZGAR Aurora 3000 Puffs
ZGAR electronic cigarette uses high-tech R&D, food grade disposable pod device and high-quality raw material. All package designs are Original IP. Our designer team is from Hong Kong. We have very high requirements for product quality, flavors taste and packaging design. The E-liquid is imported, materials are food grade, and assembly plant is medical-grade dust-free workshops.
Our products include disposable e-cigarettes, rechargeable e-cigarettes, rechargreable disposable vape pen, and various of flavors of cigarette cartridges. From 600puffs to 5000puffs, ZGAR bar Disposable offer high-tech R&D, E-cigarette improves battery capacity, We offer various of flavors and support customization. And printing designs can be customized. We have our own professional team and competitive quotations for any OEM or ODM works.
We supply OEM rechargeable disposable vape pen,OEM disposable electronic cigarette,ODM disposable vape pen,ODM disposable electronic cigarette,OEM/ODM vape pen e-cigarette,OEM/ODM atomizer device.

Aurora 3000 Puffs,Pod System Vape,Pos Systems Touch Screen,Empty Disposable Vape Pod System,3000Puffs Pod Vape System
ZGAR INTERNATIONAL(HK)CO., LIMITED , https://www.zgarpods.com